The files from the future
 For some unknown reason a lot of the files on my Linux server had modification dates set to sometime in the future. This in turn caused problems when mounting the filesystem from my Windows box, where the files appeared to have no date set at all.
This command (on the server) solved the issue:
find . -newermt "Sun Feb 20 17:51:47 CET 2011" -exec touch {} \;
The command sets the modification date of all files below the current directory, with dates newer than “Sun Feb 20 17:51:47 CET 2011”, to the current time.
Grouping files
A task I seem to do very often is to make a different subdirectory for every TV episode in a series and move the video file to each corresponding directory, along with any information text file, subtitle file, etc.
Now I have finally made a short script to do the work for me. It’s written in Perl and it seems to work fine on both Windows and Unix/Linux systems. However, beware of any nasty bugs! 😉
If you use Windows, you will need ActivePerl found here. Unix/Linux users probably have Perl already. How lucky you are!
The program: filegroup.pl
Enjoy!
Example:
D:\temp\My.Series>dir
 Volume in drive D has no label.
 Volume Serial Number is 5C53-0051

 Directory of D:\temp\My.Series

2011-02-20  13:44    <DIR>          .
2011-02-20  13:44    <DIR>          ..
2011-02-20  13:22             1 911 filegroup.pl
2011-02-20  13:38                 0 My.Series.S01E01.mkv
2011-02-20  13:38                 0 My.Series.S01E01.nfo
2011-02-20  13:38                 0 My.Series.S01E01.srt
2011-02-20  13:38                 0 My.Series.S01E02.mkv
2011-02-20  13:38                 0 My.Series.S01E02.nfo
2011-02-20  13:38                 0 My.Series.S01E02.srt
2011-02-20  13:38                 0 My.Series.S01E03.mkv
2011-02-20  13:38                 0 My.Series.S01E03.nfo
2011-02-20  13:38                 0 My.Series.S01E03.srt
2011-02-20  13:38                 0 My.Series.S01E04.mkv
2011-02-20  13:38                 0 My.Series.S01E04.nfo
2011-02-20  13:38                 0 My.Series.S01E04.srt
2011-02-20  13:38                 0 My.Series.S01E05.mkv
2011-02-20  13:38                 0 My.Series.S01E05.nfo
2011-02-20  13:38                 0 My.Series.S01E05.srt
 16 File(s)          1 911 bytes
 2 Dir(s)  37 267 910 656 bytes free

D:\temp\My.Series>filegroup.pl *.mkv
Creating directory "My.Series.S01E01"
Moving file "My.Series.S01E01.mkv" to directory "My.Series.S01E01".
Moving file "My.Series.S01E01.nfo" to directory "My.Series.S01E01".
Moving file "My.Series.S01E01.srt" to directory "My.Series.S01E01".
Creating directory "My.Series.S01E02"
Moving file "My.Series.S01E02.mkv" to directory "My.Series.S01E02".
Moving file "My.Series.S01E02.nfo" to directory "My.Series.S01E02".
Moving file "My.Series.S01E02.srt" to directory "My.Series.S01E02".
Creating directory "My.Series.S01E03"
Moving file "My.Series.S01E03.mkv" to directory "My.Series.S01E03".
Moving file "My.Series.S01E03.nfo" to directory "My.Series.S01E03".
Moving file "My.Series.S01E03.srt" to directory "My.Series.S01E03".
Creating directory "My.Series.S01E04"
Moving file "My.Series.S01E04.mkv" to directory "My.Series.S01E04".
Moving file "My.Series.S01E04.nfo" to directory "My.Series.S01E04".
Moving file "My.Series.S01E04.srt" to directory "My.Series.S01E04".
Creating directory "My.Series.S01E05"
Moving file "My.Series.S01E05.mkv" to directory "My.Series.S01E05".
Moving file "My.Series.S01E05.nfo" to directory "My.Series.S01E05".
Moving file "My.Series.S01E05.srt" to directory "My.Series.S01E05".

D:\temp\My.Series>dir
 Volume in drive D has no label.
 Volume Serial Number is 5C53-0051

 Directory of D:\temp\My.Series

2011-02-20  13:44    <DIR>          .
2011-02-20  13:44    <DIR>          ..
2011-02-20  13:22             1 911 filegroup.pl
2011-02-20  13:44    <DIR>          My.Series.S01E01
2011-02-20  13:44    <DIR>          My.Series.S01E02
2011-02-20  13:44    <DIR>          My.Series.S01E03
2011-02-20  13:44    <DIR>          My.Series.S01E04
2011-02-20  13:44    <DIR>          My.Series.S01E05
 1 File(s)          1 911 bytes
 7 Dir(s)  37 267 890 176 bytes free

D:\temp\My.Series>
XBMC, Ubuntu 10.10 and PulseAudio

The problem:
After upgrading the hardware of my HTPC a while back, I ran into trouble with the sound output. I now use hdmi for both sound and video. I had the audio output device set to “pulse” and the passthrough device set to hw:1,7. The passthrough audio device setting worked fine (used for media with surround sound such as DTS 5.1), but the audio output device did not. Sound through Pulseaudio sometimes gave a metallic, distorted sound and sometimes just complete silence, regardless of the application used. I tried setting both device settings to hw:1,7, which worked for most files but some low-bitrate-mp3 video files gave no sound and choppy video playback(!).
The solution:
After a lot of experimenting, I tried entering the following in /etc/pulse/default.pa
load-module module-alsa-sink device=hw:1,7
Then everything worked just fine. I have no good technical explanation why, or why this is necessary. Comments and ideas are most welcome!
The art of cheap remote controls and XBMC
This is a guide for setting up your remote control to work in XBMC. It seems to be quite common nowadays for remotes to act as a keyboard and/or mouse. The procedure should be similar for any similar generic remote control. However, you may wish or need to modify the key mapping to your liking. I will show you how. Ok, here we go!
Background
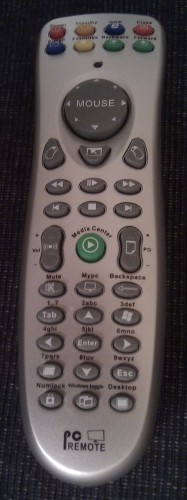
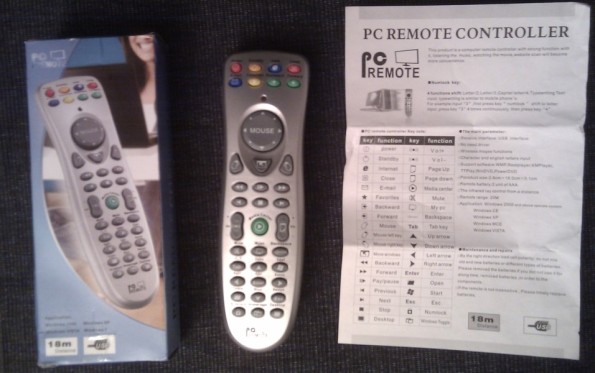
I recently bought a cheap IR remote control from DealExtreme.com for my XBMC media center setup. The remote receiver connects as a combined USB keyboard and mouse and thus works out-of-the-box in Linux and XBMC. However, some of the buttons (such as “Email” or “WWW”) did not have any corresponding function in XBMC, so I decided to remap the buttons. This is done in two steps:
- Configuring lirc to work with the remote control.
- Configuring XBMC to work with lirc.
Lirc
LIRC is a package that allows you to decode and send infra-red signals of many (but not all) commonly used remote controls. – lirc.org homepage
The first part is getting the remote to work with lirc. Lirc is the program responsible for interfacing with the remote control. If you are using Ubuntu or Debian you can install this by typing sudo apt-get install lirc.
When installed, you’ll need to modify /etc/lirc/hardware.conf. You might like to use the configuration program launched when installing lirc in Ubuntu. The most important lines are the following:
REMOTE_DRIVER="devinput"
REMOTE_DEVICE="/dev/input/by-id/usb-04b4_0100-event-mouse"
The driver used for a USB human interface device (such as this particular remote) is “devinput”. The REMOTE_DEVICE line might vary with your remote model.
ls /dev/input/by-id/
will list the devices to choose from. Please note that any regular usb keyboard and/or mouse you might have connected will probably also show up here. To find out which one is the remote, you can unplug your remote receiver and see which device files disappear.
Your hardware.conf file should look something like this:
# /etc/lirc/hardware.conf
#
#Chosen Remote Control
REMOTE="Linux input layer (/dev/input/eventX)"
REMOTE_MODULES=""
REMOTE_DRIVER="devinput"
REMOTE_DEVICE="/dev/input/by-id/usb-04b4_0100-event-mouse"
REMOTE_SOCKET=""
REMOTE_LIRCD_CONF="devinput/lircd.conf.devinput"
REMOTE_LIRCD_ARGS=""

#Chosen IR Transmitter
TRANSMITTER="None"
TRANSMITTER_MODULES=""
TRANSMITTER_DRIVER=""
TRANSMITTER_DEVICE=""
TRANSMITTER_SOCKET=""
TRANSMITTER_LIRCD_CONF=""
TRANSMITTER_LIRCD_ARGS=""

#Enable lircd
START_LIRCD="true"

#Don't start lircmd even if there seems to be a good config file
#START_LIRCMD="false"

#Try to load appropriate kernel modules
LOAD_MODULES="true"

# Default configuration files for your hardware if any
LIRCMD_CONF=""

#Forcing noninteractive reconfiguration
#If lirc is to be reconfigured by an external application
#that doesn't have a debconf frontend available, the noninteractive
#frontend can be invoked and set to parse REMOTE and TRANSMITTER
#It will then populate all other variables without any user input
#If you would like to configure lirc via standard methods, be sure
#to leave this set to "false"
FORCE_NONINTERACTIVE_RECONFIGURATION="false"
START_LIRCMD=""
I don’t have any IR transmitter, so I’ll just skip that part.
Restart lirc by typing:
sudo /etc/init.d/lirc restart
To verify that lirc communicates with your remote, use the following program:
irw
XBMC
Now we will configure XBMC to work with lirc and customize the mapping of the buttons. The files we are going to take a look at are Lircmap.xml and remote.xml. Copy the system default files to your home directory:
cp /usr/share/xbmc/system/Lircmap.xml $HOME/.xbmc/userdata/
cp /usr/share/xbmc/system/keymaps/remote.xml $HOME/.xbmc/userdata/keymaps/
Now you can edit your local copies. These will add to or override the system default files.
remote.xml
remote.xml is the file that maps between predefined “virtual buttons” and actions within XBMC. If you are satisfied with the predefined buttons you don’t have to modify this one. If however you wish to access more XBMC functions than the ones provided you can add your own custom virtual buttons by using the tag <obc#> inside <universalremote> tags
<universalremote>
   <obc#>XBMC_Function</obc#>
</universalremote>
where # is a number between 0 and 255. This is an excerpt from the beginning of my own remote.xml:
<keymap>
 <global>
<!-- BEGIN My own config   -->
  <universalremote>
   <obc0>ToggleWatched</obc0>
   <obc1>AudioDelayMinus</obc1>
   <obc2>AudioDelayPlus</obc2>
   <obc3>NextSubtitle</obc3>
  </universalremote>
<!-- END My own config   -->
<remote>
 <play>Play</play>
 <pause>Pause</pause>
Each XBMC window has a section in remote.xml. As explained in the remote.xml comments, the <global> section is a fall through – they will only be used if the button is not used in the current window’s section. As the PgUp and PgDn buttons have no function when playing a video, I want to use these to adjust the subtitle delay. I have entered this in the <FullscreenVideo> section:
<FullscreenVideo>
 <remote>
  <pageplus>SubtitleDelayPlus</pageplus>
  <pageminus>SubtitleDelayMinus</pageminus>
Note that I don’t use custom <obc#> buttons for this. I don’t want to add a new button. I just redefine what function is to be called when a predefined button is pressed.
Lircmap.xml
Using irw you can see what keycodes correspond to which button on your IR remote. Now we will assign these keycodes to the XBMC virtual buttons defined in the remote.xml file.
First, make sure that the following line contains the name of your remote device as written in the hardware.conf file.
<remote device="devinput">
Then you can start assigning the keycodes obtained by irw to the virtual buttons defined in the remote.xml file.
Excerpt from my $HOME/.xbmc/userdata/Lircmap.xml:
<language>KEY_FILE</language>
<subtitle>KEY_O</subtitle>
<obc0>KEY_BOOKMARKS</obc0>      <!-- ToggleWatched    -->
<obc1>KEY_BACK</obc1>           <!-- AudioDelayMinus  -->
<obc2>KEY_FORWARD</obc2>        <!-- AudioDelayPlus   -->
<obc3>KEY_TAB</obc3>            <!-- NextSubtitle     -->
In the example above, I bind the “Favorites” button on my IR remote (KEY_BOOKMARKS keycode) to the <obc0> virtual button. <obc0> is defined in $HOME/.xbmc/userdata/keymaps/remote.xml to execute the ToggleWatched XBMC function. Now when I press the Favorites button, the selected movie or TV episode is marked as “watched”.
